RSA Authenticator for iOS and Android
RSA Authenticator app allows you to access various protected resources. By registering and using credentials, you can authenticate and gain access to these protected resources.
RSA Authenticator app supports multiple authentication methods. The availability of each authentication method depends on the type of credential being used and the configuration set by the credential provider.
RSA Authenticator 4.7 App Device Requirements
To run the latest version of the RSA Authenticator app, your device must meet the following requirements:
| Device | OS Version |
|---|---|
| Android | 10.0 or later |
| iOS | 16.0 or later |
Terminology
The following table lists the terminology and icon changes across different versions.
|
Description |
4.0 and earlier |
4.1.5 and 4.2 |
4.3 and later |
|---|---|---|---|
|
App name |
SecurID App |
SecurID Authenticator App |
RSA Authenticator App |
|
Short app name |
SecurID |
Authenticator |
Authenticator |
|
Icon |
|
|
|
|
User interface labels, messages, and values |
Company ID |
Organization ID |
|
|
Account |
Credential |
||
|
Tokencode |
SecurID OTP |
||
|
Token |
SecurID OTP Credential |
||
|
Add |
Add Credential |
||
What's New in RSA Authenticator 4.7
The RSA Authenticator 4.7 for iOS and Android release includes a range of technical and user interface improvements designed to enhance security while improving ease of use, delivering a smoother, more intuitive, and more secure authentication experience.
-
To enhance registration security, you must now verify your identity through a biometric check when registering a new Cloud Access Service (CAS)/Authenticate OTP credential.
-
The app’s color palette has been refreshed with our signature RSA red.
-
The More menu option has been renamed to Settings.
-
This menu now organizes related settings into designated sections. You can now tap the sections to see the details.
-
A new App Updates option appears when an update is available in the app store.
-
-
Push notifications are enhanced to present clearer information and simplify user actions.
-
The request type and the accessed application are now more prominently displayed at the top of the notification.
-
Additional details are now more visible and, when available, may include the location of the authentication request.
-
Push notifications now display the authentication method in use.
-
On-screen instructions are now clearer and more concise.
-
The Approve and Reject buttons have been relocated for simpler and more intuitive navigation.
-
Important Update for RSA Authenticate App Users
When you initially open the Authenticator app or register your credentials, you receive a prompt to migrate your existing credentials from the RSA Authenticate app to the Authenticator app. If you decide to do it later, you can access the migration feature through the More option.
Note: Migrating credentials from the RSA Authenticate app to the RSA Authenticator app is a feature introduced in RSA Authenticator 4.2.
Credentials
You can manage up to 30 credentials, including both AM (SecurID OTP) and CAS (Authenticate OTP) credentials.
Note: For security reasons, credentials cannot be backed up or restored.
Each loaded credential appears in the form of a widget. It may include a numeric code value that is only valid for the time configured by the administrator, as indicated on the widget. This numeric value is a One-Time Password (OTP) and can only be used once to authenticate.
/ngx_g_securid_otp_200x103.png)
If you are using the Authenticator app and accessing a protected application on the same device, you can tap the OTP to copy it to the clipboard, and then paste it in the Authentication interface.
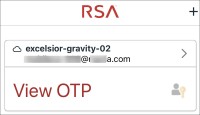
The Authenticator app supports two types of credentials: SecurID OTP credentials and Authenticate OTP credentials.
Authenticate OTP credentials are indicated with a cloud icon  on the banner widget.
/ngx_g_cloud_cred_1_200x115.png)
Each credential supports different types of registration and authentication methods.
You can add multiple credentials for the same organization. However, each of these credentials must have a unique username. For example, you can register an authenticator with organization A and then add credential 1 with the username1@example.com and credential 2 with the username2@example.com, both under organization A.
-
Each widget can be rearranged on the screen by selecting and dropping it with a finger.
-
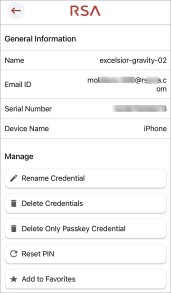
Each widget has a next button indicated with a > icon. Selecting this button redirects you to a screen that has all credential details specific to that credential.
It may include multiple options depending on the type of your credential.
-
Rename Credential: Enables you to set a meaningful name for each credential.
-
Delete Credentials: Enables you to delete the credentials.
-
Add to Favorites: Enables you to add your Favorite credential.
Note: This option appears only when you have more than five credentials.
-
Delete Only Passkey Credential: Enables you to delete the passkey specific to your credential.
-
Reset PIN: Enables you to reset/change your existing PIN for viewing Authenticate OTPs.
-
Search for Credentials
If you have at least five credentials registered in the Authenticator app, then the app home screen displays multiple tabs and Search function to help you manage your credentials.
Note: This feature is only available from RSA Authenticator 4.6.
-
Search: You can search for credentials either by name or username.
-
The home screen displays the following tabs.
-
All: The tab displays all the credentials.
-
Passkeys: The tab displays the credentials with passkeys.
-
Favorites: The tab displays the credentials added to favorites.
/home pg with segments_132x293.png)
-
Register RSA Credentials
Depending on the configuration set by your organization, use one of the following options:
-
Register credentials using My Page.
-
Import credentials.
Register Credentials Using My Page
To register credentials using My Page, follow these steps:
-
Sign in to My Page using the URL provided by your administrator.
-
Navigate to the Authenticators tab.
-
Click Register an authenticator.
-
Select RSA Authenticator App.
-
Follow the instructions provided.
Note: Biometric verification is required for the CAS (Authenticate OTP) credential registration.
-
To add more credentials, on the RSA Authenticator app screen, tap the plus sign (+) in the upper-right corner and follow the prompts to add them.
Note: Currently, you can register only one authenticator app. If you already have another authenticator app registered on My Page, you must remove it before registering the new authenticator app.
Import Credentials
To import credentials, your organization may provide the following import methods:
-
Import credential using a URL link.
-
Import credential using an email file attachment.
Your administrator sends you an activation code or password, if required. You might need to set a PIN.
Import Credential Using a URL Link
To import your credentials using a URL, perform the following steps.
Note: You must have received an email with the URL link from your administrator.
-
Open the email, tap the link, or copy and paste it into the Authenticator app to import credentials.
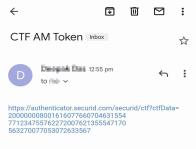
/add cred_196x199.png)
-
Click Submit.
Your credential has been successfully imported and activated.
Import Credential Using an Email File Attachment
If your administrator sends you a file attached to an email, you can import the credentials by following this step:
Tap the attached file to open it. If a password is required, enter the password provided by your administrator.
Your credential has been successfully imported and activated.
Set a PIN
After importing a credential, your administrator may instruct you to set a PIN immediately. Note that the following instructions are general guidelines. Your IT Help Desk will provide specific information, if necessary.
If you forget your PIN or it is compromised, you must reset it using the reset method provided by your IT Help Desk. Perform the steps to set a PIN:
-
On your computer, connect to your VPN client or protected application and enter your username. Keep the login dialog box open.
-
Open the Authenticator app on your device.
-
If your app displays the Enter PIN screen, perform the following steps:
Note: If you do not see the Enter PIN screen, proceed to step 4. Leave the PIN field blank and tap Submit to view the OTP.
/enter pin_200x106.png)
-
Enter OTP: On your computer, in the Passcode field, enter the OTP without spaces and click OK.
-
Set New PIN: When prompted, enter a new PIN and remember it. Enter and confirm the PIN. You will be prompted for a passcode.
-
Enter PIN in app: In the app, return to the Enter PIN screen. Enter the PIN that you have created and tap Submit.
-
Combine PIN and OTP: The code displayed on the screen combines the PIN and OTP.
-
Use Passcode for Sign-In: Go to the VPN client or application sign-in screen. In the Passcode field, enter the passcode without spaces and click OK.
-
Ready to sign in: After you set the PIN, you are ready to sign into applications.
-
-
If you did not perform step 3, use the method described below to set a PIN:
-
In the VPN client or protected resource screen, enter your username.
-
In the Passcode field, enter the OTP displayed in the app without spaces and click OK. The OTP is shown in the app.
-
When prompted, create a PIN that contains 4 to 8 digits. The PIN cannot begin with a zero. Remember the PIN.
-
Enter and confirm the PIN. You will be prompted for a passcode.
-
In the app, tap Next Code to view a new OTP.
-
On your computer, in the Passcode field, first enter your PIN, and then enter the OTP in the same field without spaces.
-
Click OK.
-
After setting the PIN, you are ready to sign into applications.
-
Authentication Methods
There are multiple types of authentication methods available, but note that all methods may not be available to you. The availability of each method depends on the type of credential you have and the configuration and settings managed by your organization.
-
One -Time Password (OTP) methods
-
Multi-Factor Authentication (MFA) methods
OTP Methods
| Authentication Option | How to Use This Option |
|---|---|
|
Enter PIN
|
If your app displays the Enter PIN prompt: Enter your PIN in the app. Tap Submit to view the passcode. |
|
PIN-less authentication
|
If you do not need a PIN, enter only the OTP without any spaces. |
|
Enter PIN + SecurID OTP
|
If you have a PIN, enter the combination of your PIN and the OTP generated from the app without any spaces. Tip: Swipe down to clear and re-enter your PIN. |
/enter pin+securid otp_200x113.png)
MFA Methods
|
Authentication Option |
How to Use This Option |
|---|---|
|
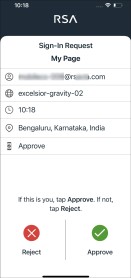
Approve push notification
|
RSA sends a notification to your device. In the app, tap Approve. You can also tap an interactive notification on the device or on an Apple watch or Android wear watch paired to the device. You might be prompted to unlock your device after you tap Approve in the notification. Tap Reject if you did not request access to an application.
|
|
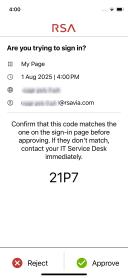
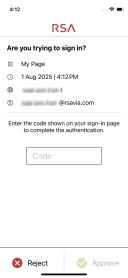
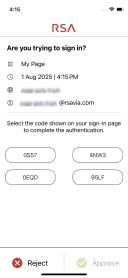
Approve push notification with visual Code Matching
Approve push notification with input Code Matching
Approve push notification with selection Code Matching
|
If Code Matching has been enabled by the administrator, you need to use a code to approve your notification. Based on the method configured by an administrator, you can approve the push notification in one of the following ways:
|
|
Biometrics
|
RSA sends a notification to your app and prompts you to authenticate using a biometric option available on your device, such as Fingerprint, Face ID (iOS), or Face Recognition (Android). Be sure to set up biometrics on your device. This method is unavailable if your device does not support biometrics. |
|
Biometric push notification with visual Code Matching
Biometric push notification with selection Code Matching
|
If Code Matching has been enabled for the Biometric push notification, users need to use a code to sign in to the page to complete authentication. Based on the method configured, users can respond to the push notification in one of the following ways:
|
|
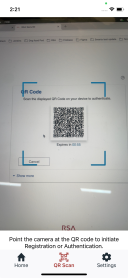
QR Code Initiate Authentication
|
When using QR code as an authentication method, a QR code is displayed on your authentication interface. You can then scan it with your Authenticator app (or directly from the Camera app on your device) and then tap Approve to accept the sign-in request. |
|
Authentication with a passkey on iOS
|
For an iOS device, within the app interface, you are prompted with a notification.
Note: This feature is supported on iOS versions 17 and later. |
|
Authentication with a passkey on Android
|
For an Android device, within the app interface, you are prompted with a notification.
Note: This feature is supported on Android versions 14 and later. |
|
OTP Credential
|
On your authentication interface, enter the OTP credential that appears on the app home screen. The credential name appears on the credential card. The OTP credential is an eight-digit number that changes every minute. If you are using the app and accessing the protected application on the same device, you can tap the OTP to copy it to the clipboard, and then paste it in the authentication interface. Your administrator may require additional authentication (for example, a biometric or a PIN) before viewing the Authenticate OTP. The app prompts you to create a PIN that is only used for viewing the Authenticate OTP. Tap View Authenticate OTP on the app and follow the instructions. You can authenticate to view the Authenticate OTP if your device is online or offline. |
/auth_passkey_ios_128x278.png)
/auth_passkey_android_125x278.png)
Troubleshooting
I cannot authenticate when entering my OTP credential.
Re-enter the PIN to make sure that you entered it correctly.
-
If entering the PIN in the app does not work, try entering the PIN + SecurID OTP in the Passcode field in the resource (such as a VPN client) you are trying to access.
-
Use your company's self-service portal to check if your SecurID OTP credential is disabled, locked, or expired. If any of these are the case, contact your IT Help Desk.
-
If you still cannot authenticate, contact your IT Help Desk.
I forgot my PIN, or another person has learned my PIN.
You must reset your PIN. Use the self-service console your company provides or other methods as instructed by your IT Help Desk.
I am being prompted to enter the next OTP.
You might occasionally be prompted for the next OTP after you enter your PIN and SecurID OTP credential. If this happens, do the following:
-
In the app, tap the arrow next to the SecurID OTP credential.
-
In the VPN client or application, type or copy (tap) the next SecurID OTP credential that displays in the app.
I did not receive Push Notifications on my device.
Depending on the configured authentication methods, you may receive approval or biometrics notifications on your application. You must respond to these notifications in order to access a protected resource, and make sure that the notifications are enabled on your mobile device.
If you have disabled or not received notifications, try swiping down from the top of the screen to refresh and receive the notifications within the app.
I need to use a new device.
You may have lost (or need to replace/upgrade) the device where the Authenticator app is installed. For security reasons, credentials and other app data are not included in the general backup system, so while the app itself can be restored on a new device, it will not include any of the credentials and data available on the previous device.
Once the Authenticator app is installed on your new device, perform these steps to continue using the Authenticator app.
-
If your previous Authenticator app was registered via My Page, go to My Page and delete the previously registered device, and register the new one.
-
Notify each of your organizations that you have set up a new device. They will need to send you a new Registration Code or URL for each credential you need to use, or a link to a site where you can scan a QR code.
I need to send information to Help Desk for Troubleshooting.
The Authenticator app automatically creates log files that are used to diagnose problems. Send the log files to your administrator or IT Help Desk, if required.
-
Open the app.
-
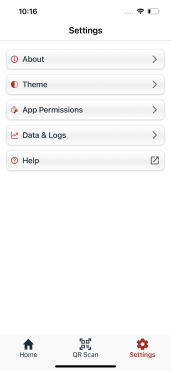
On the home screen, tap Settings in the lower-right corner.
/more screen_168x371.png)
-
Tap Data & Logs.
-
Under Activity Logs, tap Send Logs.
/send logs_171x371.png)
-
When prompted, describe the issue.
-
Select the app through which you want to send the logs to your administrator or IT Help Desk.
I need to share Binding ID.
A binding ID is a unique, 24-character long device ID. You can copy the ID and share it if required.
-
Open the app.
-
On the home screen, tap Settings in the lower-right corner.
-
Tap About.
-
Tap the Share
 icon next to the Binding ID.
/about_171x371.png)
-
Select the app through which you want to share your Binding ID.
I am unable to locate the Passkey Provider Service screen.
You might need to navigate to the Passkey Provider Service screen to add RSA Authenticator as an enabled service.
-
On the home screen, tap Settings on the lower-right corner.
-
Tap Passkey Provider Service and select RSA Authenticator.
The FIDO icon in my credential card seems inactive.
A credential card will display a disabled FIDO icon until a passkey is registered on My Page.
I have a device with Android 14 or later installed, but I don't see the passkey option.
The passkey option is available only if the device manufacturer has enabled it. The credential provider mechanism is a feature introduced by Google in Android 14.
Please check with your device's manufacturer to find out if and when they plan to enable this feature on their Android build.
The Passkey Provider Service on Android is disabled on the Settings screen.
The Passkey Provider Service is disabled in the following cases:
-
Your device is running on OS version 13 or earlier.
-
Your device is currently operating on OS version 14 or later, but the Passkey Provider Service is not enabled by the manufacturer of your device.
I cannot register a passkey with Firefox browser.
The current version of the Firefox browser does not support the technology required to use a passkey within the RSA Authenticator app.
Consider using an alternative browser, such as Microsoft Edge, Google Chrome or Safari.
Copyright
© 2026 RSA Security LLC or its affiliates. All rights reserved.
RSA believes the information in this publication is accurate as of its publication date. The information is subject to change without notice.
Use, copying, and distribution of any RSA software described in this publication requires an applicable software license.
RSA and other trademarks are trademarks of RSA Security LLC or its affiliates ("RSA"). For a list of RSA trademarks, go to https://www.rsa.com/rsa-trademarks/. Other trademarks are trademarks of their respective owners.
Use, copying, and distribution of any RSA Security LLC or its affiliates ("RSA") software described in this publication requires an applicable software license. RSA believes the information in this publication is accurate as of its publication date. The information is subject to change without notice.
THE INFORMATION IN THIS PUBLICATION IS PROVIDED "AS IS." RSA MAKES NO REPRESENTATIONS OR WARRANTIES OF ANY KIND WITH RESPECT TO THE INFORMATION IN THIS PUBLICATION, AND SPECIFICALLY DISCLAIMS IMPLIED WARRANTIES OF MERCHANTABILITY OR FITNESS FOR A PARTICULAR PURPOSE.